The meeting Owl Pro is a 1080p resolution, 360-degree smart video camera. It automatically highlights and shifts focus to different people in the room when they speak. When more than one person is speaking, the Owl Pro will show a split screen to focus on the people speaking.
Selecting the OWL Camera/Changing Cameras
When there is more than one camera connected to the computer, such as a webcam or the document camera, you may need to choose the Owl camera as the default camera. To set your default camera, follow the steps below.
- Log in to the Zoom application on the computer.
- Click the profile icon in the upper right corner of the window.
- Click Settings to open the settings window (you can also click on the gear icon just below the profile icon and it will take you to the settings area)
- In the settings window, select the Video tab on the left side.
- Under the preview window, click the box next to Camera to open the drop-down menu.
- Choose the camera you would like to be set as default.
The default camera will be the camera that Zoom uses each time you start a Zoom meeting. This is computer and profile specific, so if you move to a different room you may need to do this process again. There may be circumstances you need to switch quickly between cameras, which will more than like happen especially if you must show something with the Document Camera. To switch between cameras while a meeting is happening, follow the steps below.
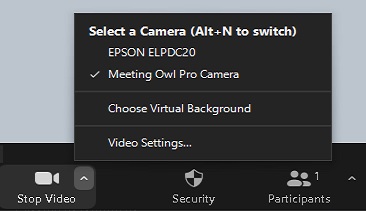
- While in a Zoom meeting, click the upwards pointing arrow next to the Stop Video button.
- Select the camera you would like to use from the list of available devices.

Rotating the Owl Camera Orientation 180 degrees
Most Owl cameras are mounted to the ceiling, which places the camera upside down. If you start a Zoom meeting and notice that the camera is showing everything as upside down, you will need to rotate the camera orientation in the Zoom settings. To do this, follow the steps below.
- Log in to the Zoom application on the computer.
- Click the profile icon in the upper right corner of the window.
- Click Settings to open the settings window.
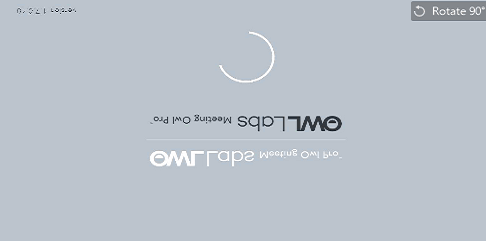
- In the settings window. select the Video tab on the left side. In the video settings is a preview window that shows the current camera. In the top right corner of the preview window, click Rotate 90 twice to orient the camera correctly.
You can quickly access the Video Settings window from inside a Zoom meeting by clicking the upwards pointing arrow beside the Stop Video button and selecting Video Settings from the options.
Selecting the microphone
While most classrooms will automatically default to the Owl camera, there may be instances that you will need to select the correct microphone you would like to use. Follow the steps below to quickly change between microphones.
- Start your Zoom meeting and connect with computer audio
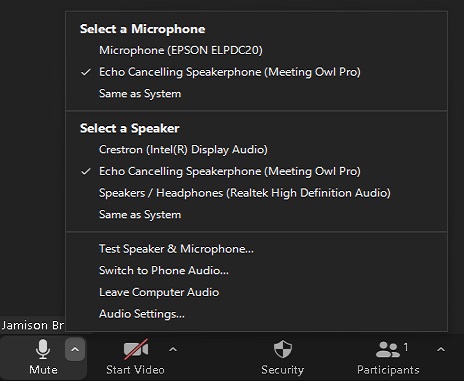
- Once computer audio is connected, click the upwards facing arrow next to the Mute/Unmute"button to show a list of available devices.
- In the section Select a Microphone, you can choose between the connected microphones.

It is strongly suggested, if you are doing a class where there is student participation. that you use the Meeting Owl Pro microphone. The Owl microphone has intelligent noise canceling if the Owl microphone and speaker are being used simultaneously.
Troubleshooting and FAQ
I am not seeing any video from the Owl camera -When you first log in to the computer and sign into Zoom,the Owl camera may display a gray background with a loading circle. This loading screen is a sort of a sleep mode. Please approach the Owl camera and, when close to it, speak and wave your arms to take the Owl camera out of sleep mode.

There is a lot of echo and feedback - If you are noticing a lot of echo and feedback, try these solutions
- Make sure no one else in the physical classroom has Zoom opened on their laptop. If they must, make sure their microphone and speakers on their laptop are muted.
- Check that you are using the correct microphone. It is suggested that you use the Meeting Owl Pro microphone
- Check that you are using the correct speaker. Using the Meeting Owl Pro as the speaker for the class will help with the noise canceling.
I have no audio, or my mic is not working - If you start your meeting and cannot hear anyone speaking, make sure your speaker is correctly set. You can test your speaker and microphone from inside a Zoom meeting by clicking on the upwards pointing arrow next to the Mute/Unmute button. From the list of options, click Test Speaker and Microphone. A chime will start playing, and a small window will pop up on your Zoom screen asking if you hear a ringtone. If you do, click Yes if not, click No. If you click No, Zoom will begin cycling through your speakers to help fix the issue. This same process will then begin for your microphone, where you will be asked to speak for a few seconds and then it will play the recording back.