 With Crimson Connect, managing all the different aspects of your organization become much easier.

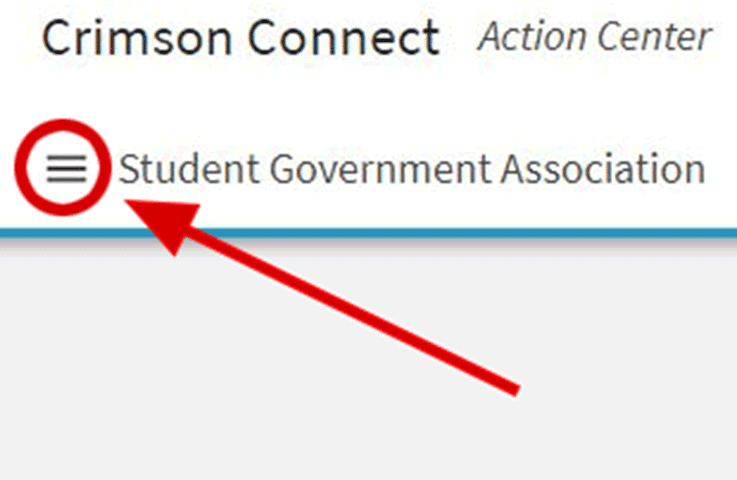
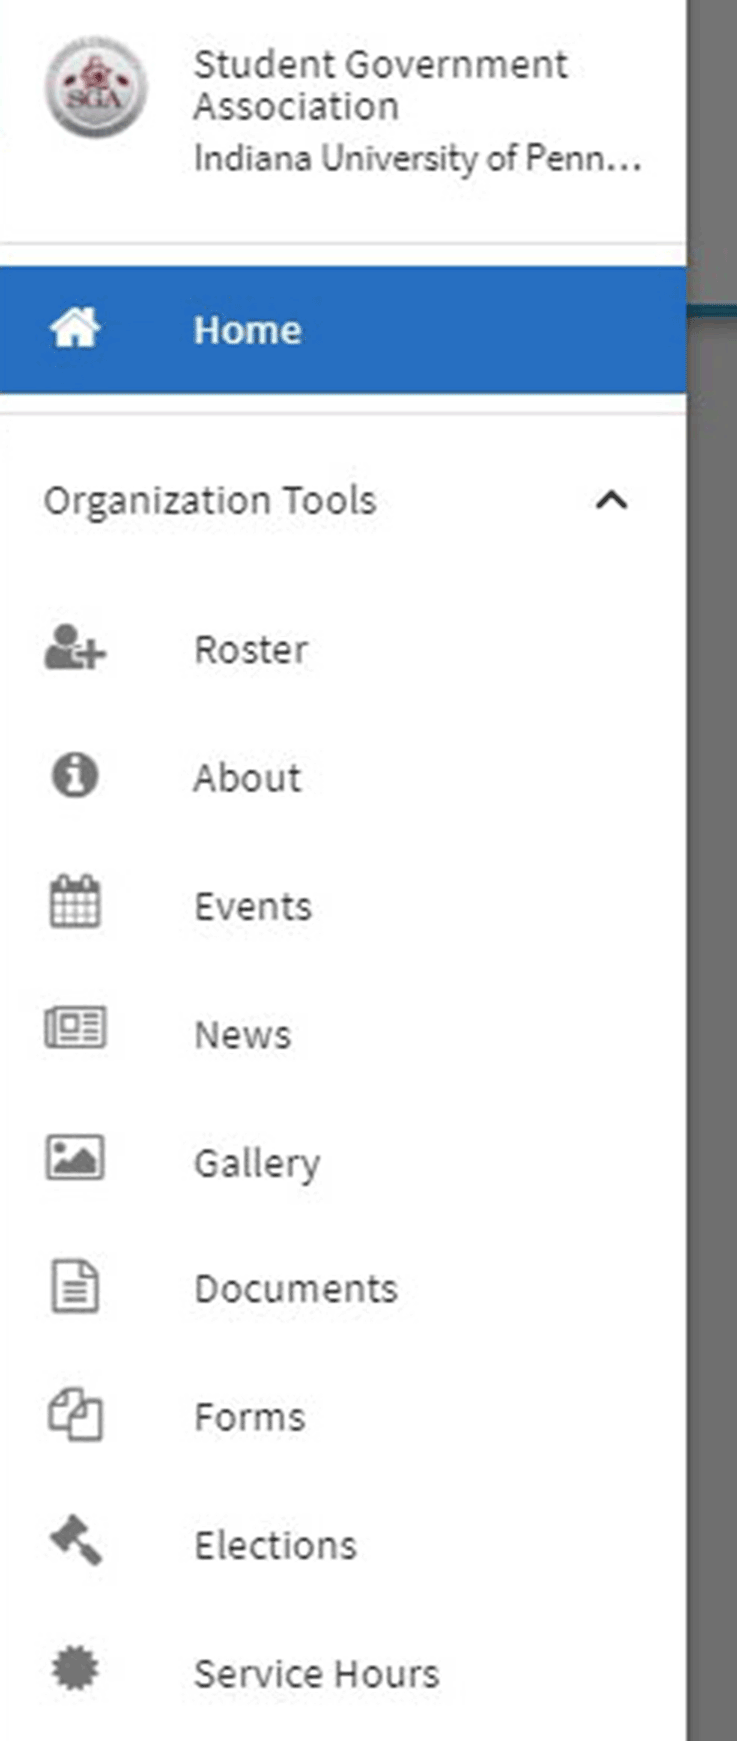 Remember that all organizations must complete a re-registration process before the end of each academic year in order to stay active. This process involves updating officer contact information, roster, and advisor info and reviewing the club's constitution and bylaws.
For all other management features, scroll down to keep reading.
Roster
Inviting New Members
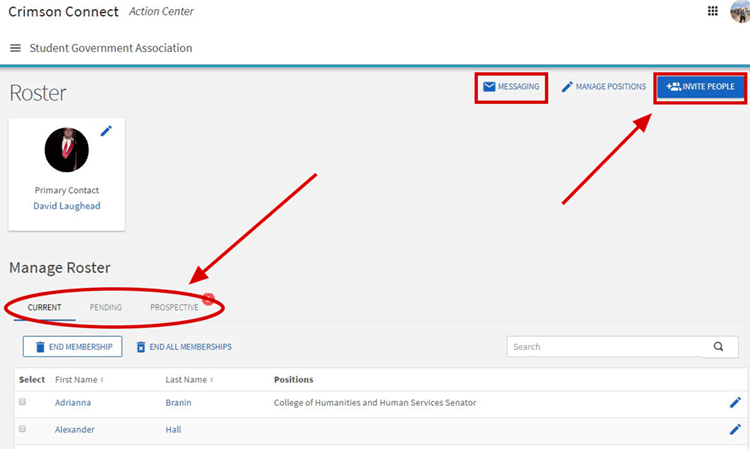
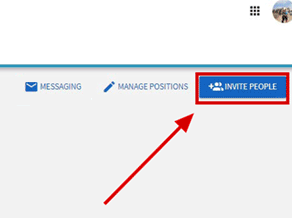
- Click on Invite People in the top-right corner, then enter the e-mail addresses of the individuals you wish to send invitations for membership (use their four-letter ID; i.e., XXXX@iup.edu). Select a designation from the Invite as drop-down if you would like to assign a specific position or officer designation to the person you are inviting. Leave the designation as “member” if the person does not need to be assigned a position—if the position you want to use has not yet been created, you can always add a designation after the user has accepted your invitation to the group. Finally, click Send Invitations when all people have been added to the list.
Approve New Membership Requests
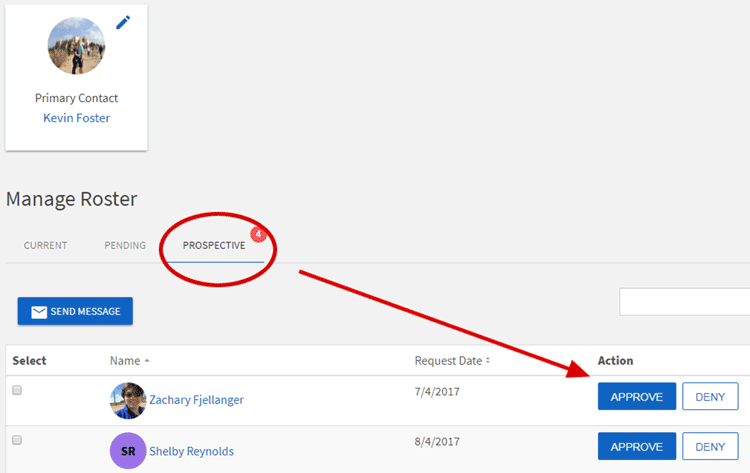
- In addition to being invited to join your organization, prospective new members can request to join by clicking the Join Organization button on your organization's home page. These members must be approved by organization officers before they are added to the organization's roster. From the organization's pop-out menu, select the Roster tab on the left. Select the tab labeled Prospective in the middle of the page.
- Pending members are those your organization has invited to join. Prospective members are those who have found the organization and indicated they would like to join.
- Review the users who are awaiting membership approval, and then click Approve or Deny next to each user, confirming each action.
Assigning Positions to Officers or Members
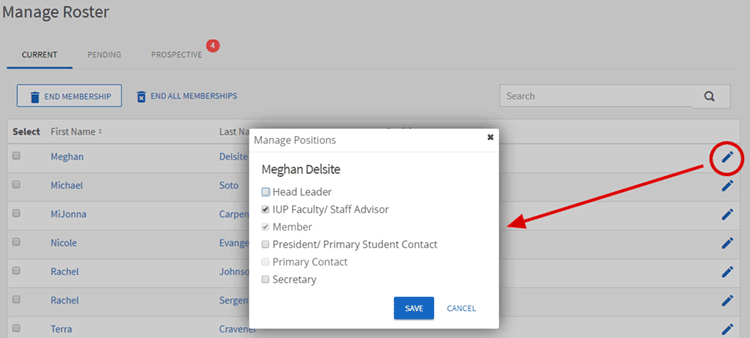
- From the organization's Roster, locate the member you would like to assign an officer position. Click Edit Positions to the right of the member's name (use the pencil icon). Select the appropriate position from the list of positions available. If the appropriate position does not already exist, see below for instructions on creating new positions. Click the Save button. The roster page will reload, and the position now assigned to the member will be displayed.
Communicating with Members
 Crimson Connect allows you to send e-mails to your entire membership roster or subsets of your membership. These e-mails can sent via any mail platform, and can include links and attachments.
 - Note: Relays can take up to 24 hours to send, based on the number of recipients.
- You will be given a temporary relay address to which you will send your message.
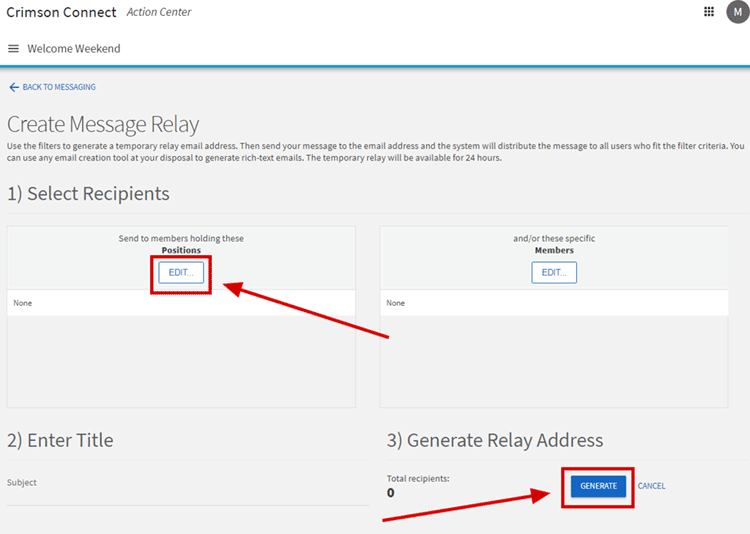
- From your organization's page, click Roster in the pop-out menu, then click Messaging, which will appear on the top of the page.
- Click the Create Relay button.
- Select the recipients for your message You can send to specific position holders or to all members, which is everyone on your organization's roster.
- You will be given a temporary relay address. If you use Outlook, simply click the address. If you would like to use a different e-mail server, simply copy and paste the address into the Send To region. This address will expire in 24 hours.
Events
Crimson Connect is your source for events on campus. Use these resources to register and promote your organization's events.
Creating an Event
- To create an event, navigate to your organization's homepage and click Events on the pop-out menu on the left-hand side. From there, click on the blue Create Event button in the top right corner.

- At this point, Crimson Connect will guide you through the process of creating and registering your event. Please fill out all required information, and add a poster to ensure that your event meets all standards and maximizes its attention.
[19 Create Event Page]
Event Registration Information
- Events are not auto-approved, but must be approved by a site administrator. We encourage you to submit your events in Crimson Connect at least two weeks in advance. Events can be submitted up to one week after they have occurred. Any submission for an event older than one week may require justification, and may or may not be approved following review.
- Events are reviewed on a daily basis during the work week for approval.
- Most events are approved immediately upon review.
- Events occurring in large event spaces (i.e., HUB, KCAC, Wallwork Plaza) need to be reviewed by the manager of that space before being approved.
- You can edit or cancel an event once it has been created by opening the event and clicking the Change Details button in the Manage Event portal.
- All event changes must also be approved by a site administrator. However, do not hesitate to make any necessary changes to your event.
- Creating an event through Crimson Connect does not reserve a space. You must go through the Registrar's Office, Virtual EMS, or the appropriate venue to book your space on campus prior to creating your event in Crimson Connect.
- As you progress through the Event submission process, your information is saved once you click the Next button.
Documents
Documents can help you and other members keep track of important information for your organization, such as the constitution, bylaws, guidelines, fundraising information, and more. Use this section to learn more about how to control documents on your page.
Uploading a New Document
- From the pop-out, select the Documents tab.
- Click Add File towards the top of the page
- Select the file you wish to upload from a saved location by clicking on Upload. Files must be less than 10 MB in size.
- Provide a title of the document.
- Indicate the type of document from the drop-down menu.
- Click Add.
- To update security options, click the three black dots near the download button. You will then be able to display the document to either:
- The Public: Allows anyone to view the document.
- Anyone on Campus: Allows anyone within the system to view and download the document.
- Only People on the Organization Roster: Allows only members to view and download the document.
- Only Organization Members in Specific Positions: Allows you to select what specific officers/members have access to view and download the document.
- To update security options, click the three black dots near the download button. You will then be able to display the document to either:
Editing a Current Document's Properties
- From the pop-out menu, select the Documents tab.
- Choose to create a folder or add file to a previously established folder.
- When you click on Add File you will have the option to give the document a Title and Type (i.e., Finance Documents, Meeting Minutes, Applications, etc.).
- Designate the permissions of the document. You can make documents viewable to large audiences such as the public or anyone on campus who is logged into Crimson Connect, or you can limit access to only organization members or people in specific positions (i.e., Exec Board).
- To update the actual document file, follow the steps for replacing an existing document. Some documents cannot be moved or deleted except by a university administrator.
Replacing an Existing Document
- From the pop-out menu, select the Documents tab.
- Locate the document you would like to replace.
- Click the three-dots icon and select Delete.
- Note: Once a document is deleted, it cannot be recovered.
- Upload the new version of the document you are replacing by following the steps in “Uploading a New Document” above.
Forms
In order to create a form, you must have administrative access to the Forms feature within Crimson Connect. Officer positions can be created and access levels can be set by the president of your group or anyone with All Access.
Creating a Form
- Click Manage Organization
- Click Forms
- Click +Create Form in top right corner.

- Complete the basic form information and designate who you want to have access to completing the form (additional details about form properties below)
- Click Save and Add Questions.
Question Type
- Check Box List: Multiple-choice question that allows users to choose more than one option.
- Radio Button List: Multiple-choice question that only allows users to select one option.
- Text Field: Open-text response. Alter the number of rows to provide the user a larger space to write in for longer answers.
- Drop-Down List: Multiple-choice question where users can only choose one option. The only difference between the drop-down and radio button options is that the user has to click the drop-down to view the available choices.
- Instructions: This is your method of providing additional instructions or information to the user. Instructions do not require any action on the part of the user.
- Single Check Box: Think of this as a method to provide the user a set of terms and conditions that they need to agree to before they can proceed on the form. You can input the terms that need to be agreed upon, and the user will be provided a single check box to confirm their agreement.
- Ranking: Provide the user multiple answer choices for them to rank. You can also determine the maximum number of items they need to rank.
- File Upload: Allow the user to upload a file from their computer. Files must be under 4 MB, and the uploader accepts most file types. If you prefer a specific file type, make sure to indicate this within the instructions of the question.
Question Options
- Required: Select the Required box if you want the question to be mandatory for users before proceeding. This option is available for all question types.
- Shuffle Answers: For Check Box List and Radio Button List question types, you can choose to shuffle your answers. For example, if you input an alphabetical list but want the answer choices to appear random, you can shuffle them. Note: This will not shuffle the answers every time a different user fills out the form.
- Minimum and Maximum Answers: If you are utilizing the Check Box List, you can identify the minimum or maximum number of answers a user can select.
- Use the Add New section on the bottom to add varying types of questions, instructions boxes, or a file upload button. You can reorder any questions after creating them.
- Note: The default for all questions is to be required. If you want a question to be optional, click on the question, then click the Edit button. Then uncheck the Required box under Validation.
Details about Form Properties
- Active: Your form will only be live when the Active Box is checked and during the timeframe you set for the start and end times.
- When this box is checked the form will not go live until the designated start date, but it will automatically turn on at that time.
- Generally, the only reason you would uncheck this box is if you need to temporarily or unexpectedly deactivate your form.
- Start Time/End Time: Your form will be live during the time frame you designate here (so long as the Active box is checked).
- Allow Multiple Submissions: Check this box if you would like to allow users to complete this form multiple times.
- Allow Submissions Only from Users on your Roster from these Positions: You have the ability to designate who you want to have access to complete the form here.
- General Access: To allow any user to be able to access a form, select General Access. Users will still have to log in to the system, but they do not have to be a part of your organization. Only people with IUP IDs can access forms.
- Notifications: There is a Notifications tab where you can select users that you would like to be e-mailed every time a form is submitted.
- Only users with the appropriate level of access (designated in the Roster section) will be able to view forms.
- You are not required to have anyone notified when forms are submitted
Distributing a Form
- Do not simply open the form and copy the URL from your address bar. Since every submission is saved, a unique URL is created for each user that opens a form. Your URL will not work for other users.
- Click Forms in the pop-out menu, then click Manage Forms.
- Click Publish next to the appropriate form.
- Use the URL provided.
Elections
Crimson Connect makes voting easy! Follow these instructions to host an election on Crimson Connect:
Creating an Election for your Organization
- From the pop-out menu, select the Elections tab.
- Click Create Election at the top right of the page.
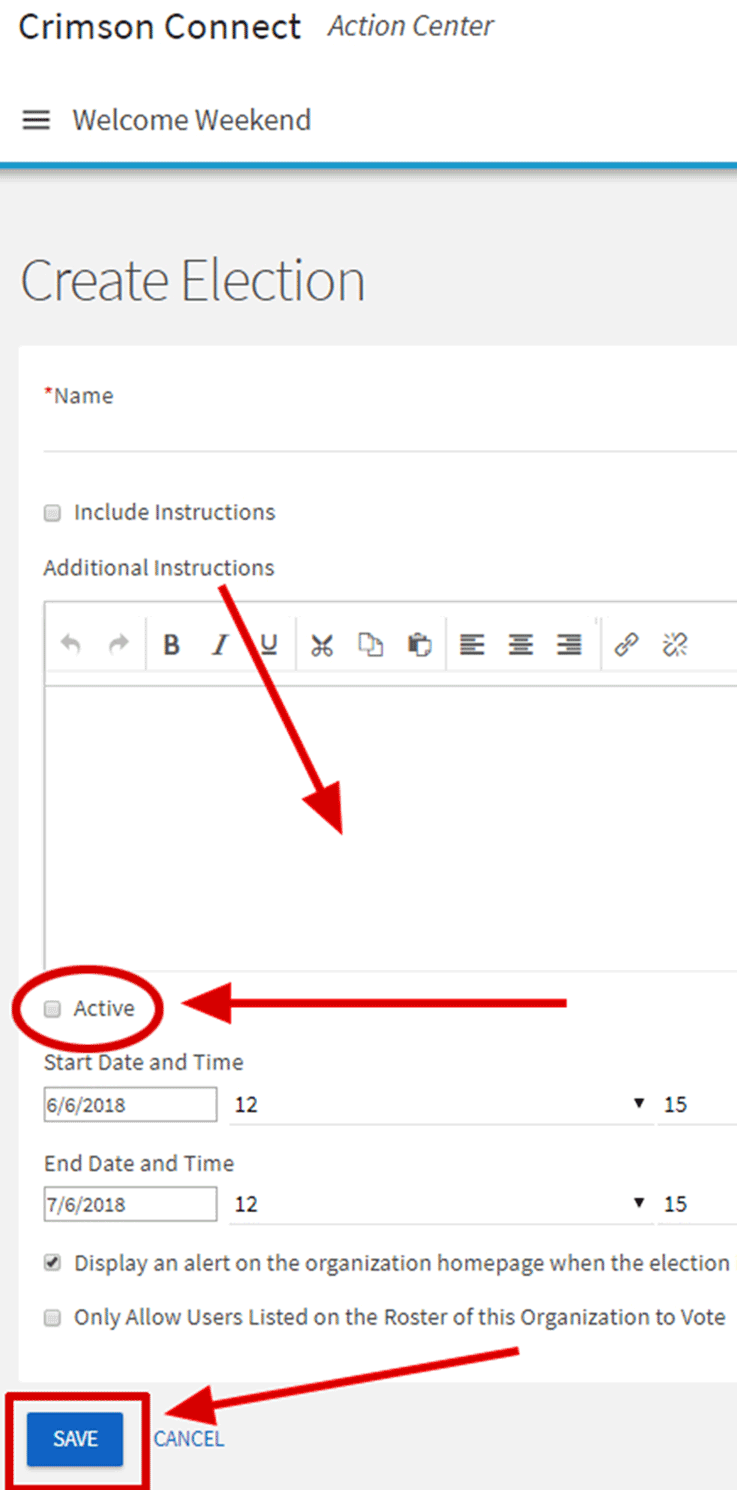 Identify the name of the election.
 - Check if you would like instructions displayed to voters, and complete the additional instructions box with any relevant information. We always recommend that instructions be included on elections.
- Indicate if the election should be “Active” (meaning turned on during the selected dates), and select the date range for voting.
- You can always turn the election to Inactive or change the voting timeframe once the election has been created
- Indicate if you would like an alert displayed on your organization's home page when voting is open to prompt users to vote.
- Indicate if the election is for organization members only (people listed on your Crimson Connect Roster). You can elect not to limit the election and have it open to any Crimson Connect user.
- Click Save.
Creating Ballots for your Election
- You can create as many ballots as needed, but each ballot can have only one questions or a series of questions. Each ballot can be accessible to any Crimson Connect user, only to members of your organization's roster, or only for a specific population of users called an eligibility list (i.e., members of an organization's Executive Board, first-year members of an organization, etc.). A user will see only the ballots they are designated to see. Only Crimson Connect site administrators have the ability to create eligibility lists. If you have specific voting needs for your organization and would like help creating eligibility lists for an election, please contact the Office of Student Organizations and Governance.
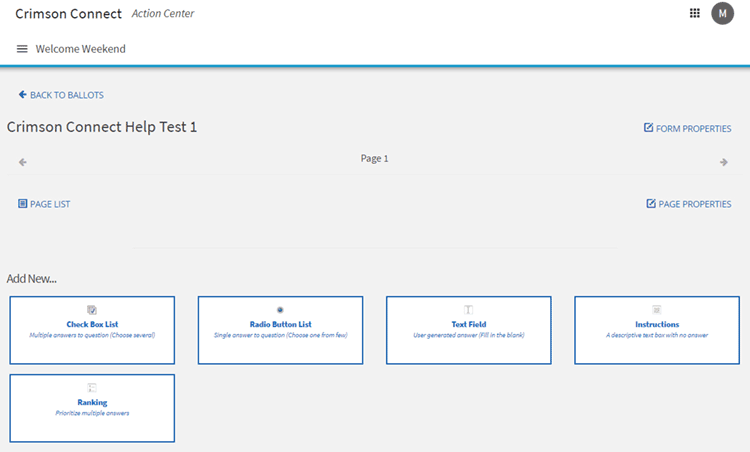
- Once you have created an Election, make sure you are in the Ballots tab and click Create Ballot.
- Enter the name of the ballot.
- If you have not worked with an administrator to create an Eligibility list, your election will default to Enable General Access.
- General Access either means anyone on Crimson Connect or anyone on your membership roster, depending on what you selected when you created the election
- Click Save when all access has been identified.
- [22 Create Ballot One]
- Click the format on the left side of the page of the question you'd like to add to the ballot:
- Check Box List: Multiple-choice question that allows users to choose more than one option.
- Radio Button List: Multiple-choice question that only allows users to select one option.
- Instructions: This is your method of providing additional instructions or information to the user. Instructions do not require any action on the part of the user.
- Ranking: Provide the user multiple answer choices for them to rank. You can also determine the maximum number of items they need to rank.
- File Upload: Allow the user to upload a file from their computer. Files must be under 4 MB, and the uploader accepts most file types. If you prefer a specific file type, make sure to indicate this within the instructions of the question.
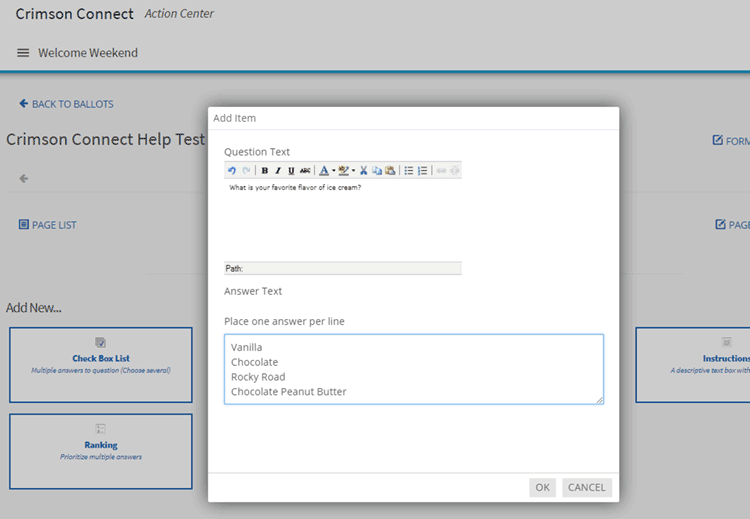
- Type in text for the question and answer set, if applicable. Click OK.
- Text fields can be associated with an answer [e.g., Other (please specify)], if needed.
News
The News feature can be used to post press releases, news stories, or blog posts for your organization that include the ability for users to provide comments and initiate discussions. Only officers with administrative access to News can post news articles.
Creating a News Article
- From your organization's pop-out menu, click the News button
- Click Create Article button near the top of the page.
- Enter the Title, Summary, and full story text of the article. You can use the text editing features to customize the style of the story of your article.
- Include a header image by selecting Choose File and upload the file.
- Select the permissions for the article by selecting the radio button to the left.
- The Public: Anyone is able to view the article and it will appear in the news feed on the Crimson Connect home page as well as the organization's home page.
- Anyone on Campus: Anyone logged in to Crimson Connect is able to view the article, and it will appear in the news feed on the Crimson Connect home page as well as the organization's home page.
- Only People on the Organization Roster: Will only be viewable to members of the organization, and can be accessed by selecting News on the left side for the group.
- Only Organization Members in Specific Positions: Only viewable to the selected officer positions, and can be accessed by selecting News.
- Click Save.
Uploading Photos
- Using the Photo Gallery section of your Crimson Connect site allows you to keep visual records of your organization's activities and provides a dynamic way to display the work of your organization to campus and potential members. Only officers with administrative access to Photos can create photo albums and upload images.
- From your organization's pop-out menu, click Gallery.
- Click Create Album near the top of the page.
- Enter a name for the album and brief description.
- Select viewing options for the album:
- Public
- Anyone on Campus
- Only People on the Organization Roster
- Only Organization Members in Specific Positions
- Click Create Album.
- Click Add Photo near the top of the page.
- Enter a title and caption for the photo, and select the file from a saved location.
- Click Save Photo.
- Repeat steps 6–8 for each additional photo to be added.
- Click Back to Albums once all photos have been uploaded to the album.
Removing Photos
- From the Photo Gallery section on your organization's page, locate the photo to be removed within an album
- Click the red X in the corner of the photo.